Page 1 of 1
2005 Impala Install
Posted: Mon Oct 23, 2006 4:28 pm
by Andre
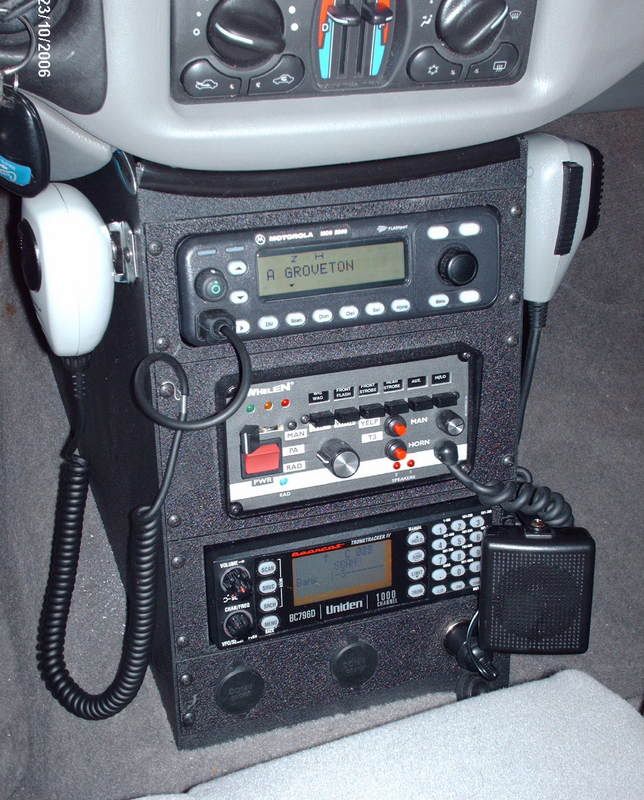
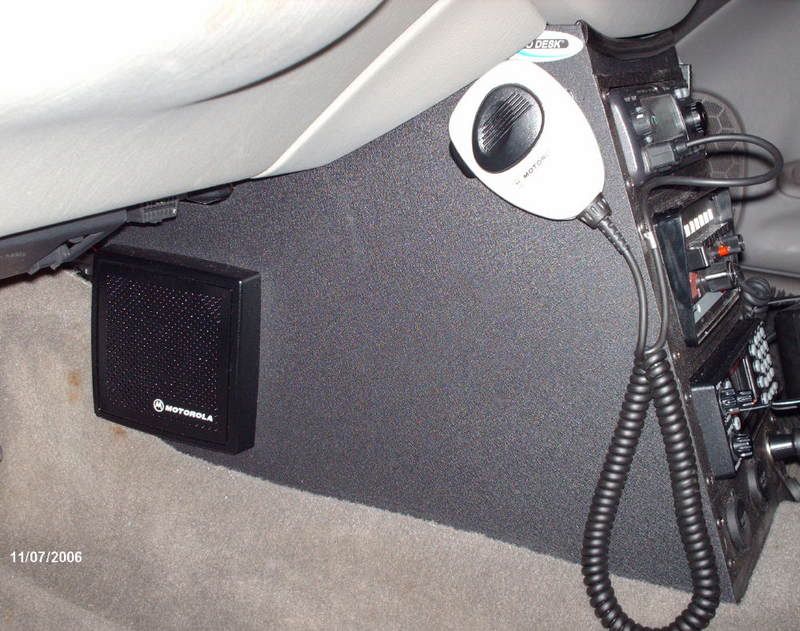
This is my 2005 non-police package Impala, obviously my personal vehicle. The little speaker down at the bottom right is for the Bearcat Scanner, cause you can't hear the speaker on the bottom of the unit when its in the console. Looking for a better solution. Also I want to install a HSN4032A speaker into the side of the console, flush mount, tryin to figure out the best way to do that. Overall I am happy thus far....
<img src="
http://i77.photobucket.com/albums/j72/b ... nv0085.jpg">
Posted: Mon Oct 23, 2006 4:39 pm
by emsbuff3240
VERY, VERY, NICE!!
Looks very professional. I like it a lot. Could we get some pics of the outside, with pics of the lights and antennas?
What emergency services are you involved in?
What kind of lights are you using?
Posted: Mon Oct 23, 2006 8:14 pm
by tensi0n
I don't see how you can come up with a better solution than that. Looks great!

Posted: Fri Nov 03, 2006 10:14 am
by DaBigBR
As far as flush mounting the speaker...
I would think that you would have cut a hole in your console which will be either expensive to pay somebody to do, or difficult for most "common folk" (like me) to do.
Assuming you got a hole cut, you would have to come up with something to mount the speaker with. I would think about bolting a couple of "L" brackets on the inside that you could then use the thumbscrews from the regular speaker to attach the speaker to it (you follow?). As long as you used painted hardware that matched your console, it would probably look fine.
If it was me though, I would probably just bolt it to the outside of the console or to the passenger side kick panel or hide it under the passenger seat.
Whichever way you go, that is an awesome looking install!
Great Install for that vehicle
Posted: Mon Nov 06, 2006 12:35 pm
by txshooter
Looks great. I would suggest just simply mounting the speaker under the seat. The audio should be loud enough and will keep within the very clean lines of your install.
install
Posted: Tue Nov 07, 2006 8:13 am
by nova1010
Nice clean install,can't get much better than that,looks great.
Posted: Tue Nov 07, 2006 11:32 am
by thebigphish
here is a simple way to flush mount that speaker (if you REALLY want to flush mount it to that console) Get a 1 1/2in or 2in hole saw / punch - pop a hole in the side of it, file the edges down nice and clean, and then get one of those computer style fan covers (the size/style/finish are up to you) drill four holes around the big hole, and then mount the speaker behind the hole, cover the hole with the fan cover/grille and ther eyou go. You don't need to make it super big, or super fancy...total in parts to you (is like 15 bucks) and all you really need is a drill and a home depot.
We shot a couple of speakers into consoles like this, and it gives you a quick way to recess something (provided there is space behind it to bolt/mount the speaker to).
In terms of mounting the speakers to the back of the console (i mean inside), a easy/cheap way to pull this off is to take the horseshoe bracket that comes with the speaker, split it right in half with a hacksaw (right in the middle of the flat side that would ordinarily go against the console) turn the mounting arms around, and just selftap / bolt / tack the arms to the interior of the console....
all you have done is take this;
|speaker|
|______|
and turned it into this;
|speaker|
___| |___
( i don't think that will display correctly - but you get my drift)
The arms are the same length as the original pieces, so you know that the brackets will hold the speaker at the same depth, and you don't have to go fighting with drilling thru the other brackets that might not have the mounting holes where you need them.
Posted: Tue Nov 07, 2006 4:03 pm
by Andre
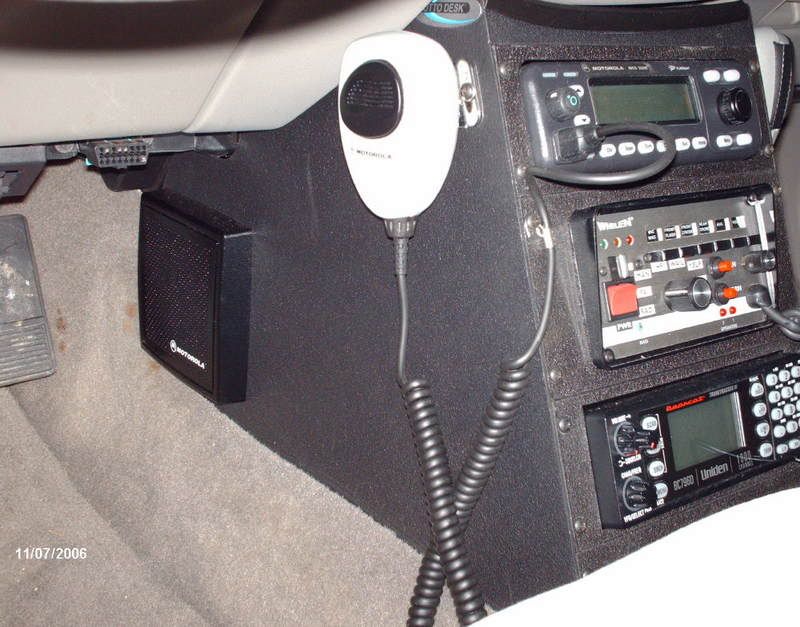
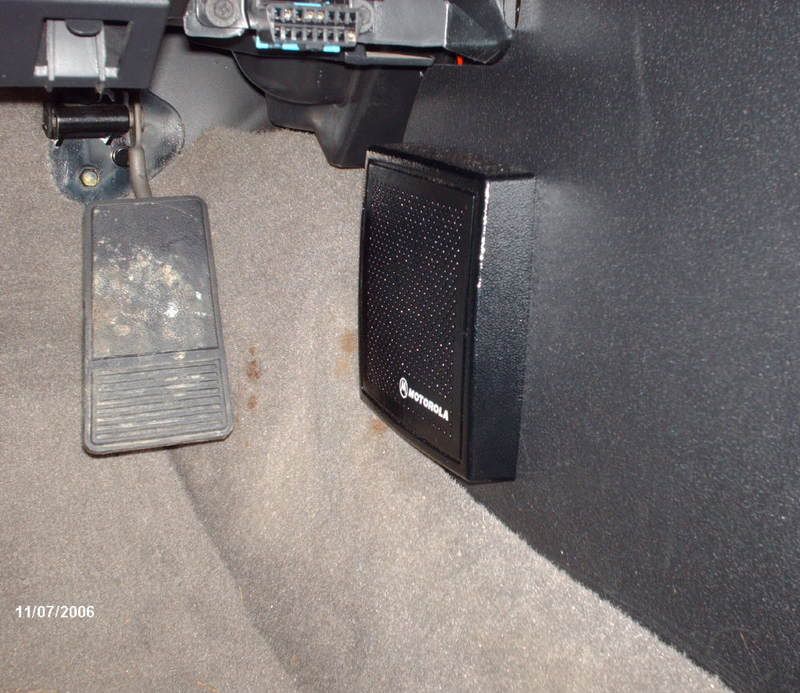
I've got a Motorola Speaker flushmounted into the side of the console with the original speaker cover grill thing mounted over it, I'll try to get pics up showing what I've done. I've seen it done before. Thanks all for your input!
Posted: Tue Nov 07, 2006 4:59 pm
by Andre
Posted: Tue Nov 07, 2006 11:15 pm
by thebigphish
Nice. How much room do you have between the gas pedal and that speaker cover? I don't think that would work for me though, i would manage to put my size 13s in the wrong place and rip that cover right off...
How'd ya do it?
Posted: Wed Nov 08, 2006 7:45 am
by 60A
Very nice! Great job

Posted: Wed Nov 08, 2006 9:11 am
by IMBEJames
First of all, VERY nice install! Very clean, professional-looking.
Just my .02 on fush-mounting the speakers, I had to do the same with 6 of them in a piece of 5/8" ply in a custom cabinet. Ended up drilling a 4" hole for the audio, then 4 holes around it that lined up with the screw holes in the plastic front of the M speaker enclosure. the 4 holes for the screws can be somewhat over-sized if you need any wiggle-room, like i did to make them all line up. I threaded a 2-inch #8 machine screw with a washer and nut through the speaker, the ply, then threaded it into the screw hole in the plastic. it fits tight, and doesnt seem to back out at all. then once all 4 are in place, just tighten the nut down to the speaker, and essentially "clamp" everything together.... Really just using the machine screw like a stud on an engine.
Im interested to see how you did it (im sure there's better ways than what I did...), but this was my experience... Again, EXCELLENT install!
Posted: Wed Nov 08, 2006 1:26 pm
by Andre
I wear a size 12 and I have no issues with space down by my feet. The plastic is hard enough and the screws big enough where I'm pretty sure I couldn't kick it off. That particular Jotto Desk Console came with the 4" diameter hole pre-cut in the side, with just some tabs still holding it in place, that just takes a hak-saw blade to zip out, 4 screw holes already pre-drilled, just had to bore them out a little bigger to get the screws that came with the speaker assembly to go through. I took the speaker assembly apart and the speaker fits into the 4 inch hole perfectly, put the grill over it and ran the screws from the backside, first through the holes in the console, then through the speaker and into that plastic grill. I would imagine it could be done on any flat surface, no more than 1/8" or so thick, with the right tools.
Posted: Wed Nov 08, 2006 3:53 pm
by apco25
A+ well done clean install.
Posted: Thu Nov 09, 2006 12:27 pm
by ESDA20
Posted: Thu Nov 09, 2006 3:31 pm
by ab
Now you just need a Ford

ab
Re: 2005 Impala Install
Posted: Wed May 13, 2009 7:53 am
by kg6bki
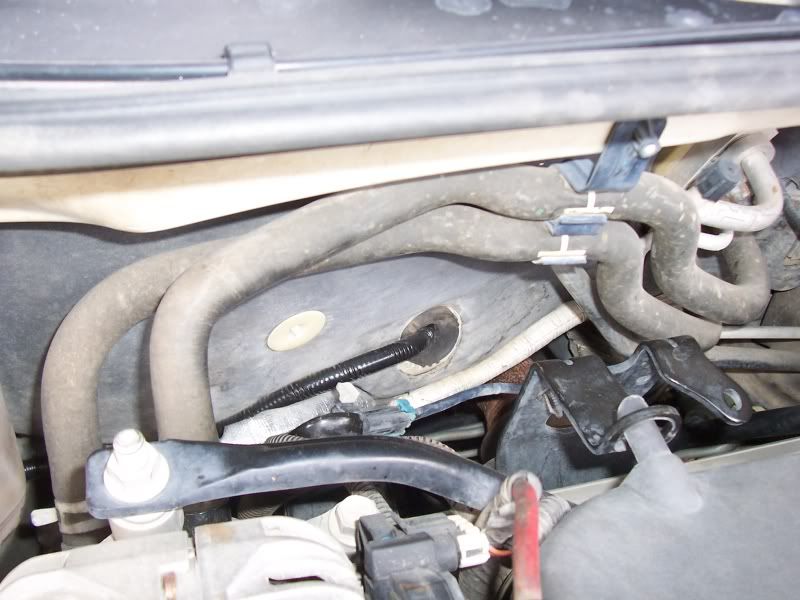
How did you get into the engine to run power? I just picked up an 05 and looking to get an install starteda...I don't see how to run a power cable from the engine to the inside of the car
Thanks
Brian
Re: 2005 Impala Install
Posted: Thu May 14, 2009 10:29 am
by motorola_otaku
If you have column shift, go through the plug where the console shift cable would go. You'll have to lay in the passenger-side floorboard and fish it out from behind and to the side of the air box underneath the dash, but it beats drilling a hole. Standard warnings about looming, securing, and fusing apply.
Re: 2005 Impala Install
Posted: Sun May 09, 2010 7:45 am
by ki6yop
Nice installation with limited space


